
This is my 2011 Double Period Project for Foundations Revealed. I worked on this project in my free time around clients, and kept forgetting to take pictures of the process. I took some notes for the dress diary, and will try to fill in as much as I can.
Inspiration:
When trying to research stays suitable for 1800-1815, I kept getting distracted by stays from 1820-30. I loved the cording and the embroidery and the details. In particular, I loved the 1819 stays and 1820 quilted corset in the Kyoto Costume Institute’s collection, as well as a pair on Karen Augusta’s site and a pair in the V&A.

1820 quilted corset. Kyoto Costume Institute.
 1")
1825-30 stays of cotton sateen with gold floss and brass eyelets. Karen Augusta #0081.
 1")
1825-35 stays with trapunto work. V&A T.57-1948.
The same design details caught my eye over and over. I love the quilting and curved lines at the waist. I also liked the boning fanning out from the busk, and the extra quilting along the back. Unfortunately, these stays are all much later than my target date of 1812, and the shapes are too curvy to go under the columnar Regency styles.
Thanks to the Transitional Stays article on Foundations Revealed, I had many more examples to look at. A couple in particular caught my eye: the 1811 stays at the Missouri Historical Society and the 1815-25 stays at the Met.
 1")
c. 1811 stays. Missouri Historical Society.
 1")
1815-25 cotton stays. The Met 2009.300.3229.
These examples are a little earlier, enough that I could feel comfortable looking to them for inspiration for a pair of 1812 stays. They still show the details of quilting, curved lines, and embroidery that I like, while keeping the overall design much simpler.
Another interesting note is that these examples all have sewn-in straps instead of straps that are adjustable and tied in place with ribbons. I like the clean look of the sewn-in straps, but realize I probably need the adjustability of straps that tie on. I decided to skip complete authenticity in order to have more flexibility later.
Pattern:
I decided to use the Mantua Maker 1800-20 Stays pattern as my base, and refer to pictures and scaled patterns in books for additional design details. For the most part, the stays are still pretty close to the Mantua Maker pattern, with the main adjustments being in the size and placement of the gussets.
Once the pattern was complete and the mock-up was fitted, I added design lines to the pattern for the layout of quilting and embroidery stitches. I marked the area for the busk, and lines for additional boning across the stomach. I added curving lines of cording at the bust and waist with room for embroidery in between, and filled in the space with diamond-paned quilting. I also added some simple cording to the back, and ran cording along the sides of the bust and under the arms.
Construction:
I chose a cotton sateen for the outer layer of the stays, but opted to use coutil for the inner layers. Most of the examples I looked at seem to be linen or cotton, and some appear to be only one layer. I’m a plus-sized girl, and I didn’t really trust plain-weave cotton or linen alone to provide the support I need. I know coutil is sturdy and would do the job, even if it wasn’t totally period-correct. I chose to use two layers of coutil, one flatlined to the sateen and one as the inner layer, so I could stitch boning channels between the two layers. This would also allow me to encase all my seams between the layers, and not have the stitching show on the inside of the stays.
I stitched several samples of the cording, playing around with width between rows of stitches and multiple strands of cord. I was using Sugar ‘n Cream cotton for the cording, and decided 2 strands had enough substance when sewn into a channel.
I also experimented with crossed rows of stitching, to see if I would need to change how I stitched the diamond-paned section. I discovered that I could ease my needle and cording in between the machine stitches where they crossed without breaking them. This made sewing the actual channels much simpler and cleaner.
I found that the size of the cording channels made a huge difference: too wide and the cording lay flat and without texture, and too small and the cord was almost impossible to insert. I used my stitch-in-the-ditch foot and adjusted my needle position to allow me to stitch precisely at the measurement that looked best with my cording and fabric.
I started with the front panel of the stays, and marked out the stitch pattern for the cording and embroidery. I left extra fabric at my seam allowances, since I anticipated that the cording would take up a bit of fabric. I basted the coutil and sateen together, then started stitching. I stitched each row of cording one line at a time, first the widely spaced rows that made up the grid, and then a second pass to make the narrow channels for cording.
The embroidery is stitched by machine. I tried to use patterns that looked simple and similar to the ones on existing stays. I wanted a soft color that would not show through a white dress. Gold seems to be a common choice, but not really my favorite, so I finally settled on a soft lavender.

Detail of cording and embroidery.
Since the busk was tapered, I needed the opening to be at the top of the corset. I noticed that several period stays had extra rows of cording below and above the busk. Since my busk was a little shorter than the length of the stays, this seemed like a good detail to add in.
The cording was inserted with a yarn needle from the back side of the coutil, under the sateen, and back through the coutil. The hardest part was keeping a grip on the needle while moving it through the channels. Since the needle is in between layers of fabric, and the channels were fairly snug, it was hard to hold it and pull. By the end of even this small amount of cording, my hands were very sore. Slightly wider channels would probably make the process easier.
I stitched all the cording channels and inserted cording before the sections of the stays were sewn together. This meant I needed careful placement, since some lines of cording matched up across seams, and others ran very close to my seam allowance.

Cording along side and back of stays.
I put flat steel boning at each side of the busk and at center back. I also added boning channels on the sides because I didn’t think cording alone would be enough, and the corset was wrinkling up without some sort of boning. Flat steels poked out too much, and reed wasn’t strong enough on its own, so I settled on spiral steel for the 3 channels on each side. Not period, but it keeps the fabric smooth and is flexible enough to be comfortable.
I ended up needing to wear the stays before I had a chance to bind them. I’m glad, because not only did I need to adjust the boning as mentioned above, I also found that it came up too high under my arms and needed to be adjusted. The busk was another issue – I had measured the busk before I ran the lines of cording below it, but hadn’t accounted for the space I would need to add eyelets at the top to tie it in place. I needed to deepen the busk pocket and shorten the corded area, which unfortunately left some marks on the sateen when I took out the stitching. I also narrowed the straps slightly and cleaned up some curves.
In order to wear the stays before they were finished, I put in grommets and tacked the straps in place with stitching. Later, I removed the grommets so I could hand-stitch eyelets instead. I added eyelets for the straps and at the top of the busk, and used twill tape to hold them in place.
The binding is cotton sateen, finished at 1/4″ wide. I stitched it by machine to the front side of the stays, then wrapped it around and finished it on the inside by hand. The only exception was the curve at the bottom of the straps, which needed both sides sewn by hand. I ran a ribbon inside the binding at the top of the bust gussets so I could gather them in as needed.

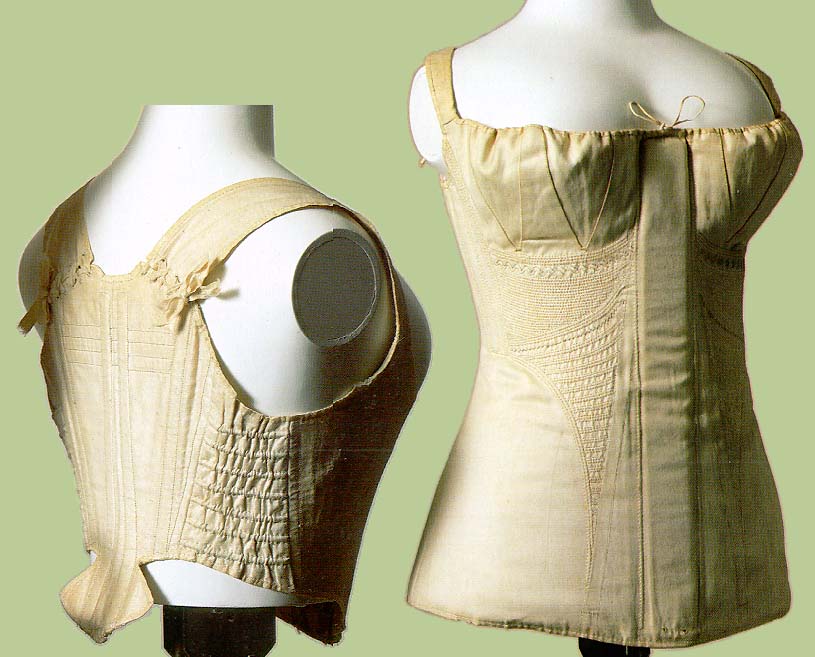
Finished stays.


Musings on Regency Waistcoats
Do you have one of those friends who will come over and ask the exact question you’ve been trying not to think about because it will slow down your project?
Read Full
The Historical Costumer’s Etsy Gift Guide
Christmas is almost here, and I’ve gathered together a list of items on Etsy that I’d love to see under my tree. They might be just the thing for your
Read Full
Swimming in Swatches
No matter the type of handiwork, I’ve always hated making swatches. I do them because I know how valuable they are, but it’s still my least favorite part of a
Read Full